If there’s something that the title of this post is it’s an overstatement. And because nobody deserves to spend hours (like I did) trying to figure out how to properly get this working, I decided to save you all the trouble and just create a post about it. Just look at the history of this blog to see how rare they are! But first, a little bit of backstory…
My current apartment is fully cabled with CAT6 all over the place and RJ45 plugs on all rooms. In the latest years, it seems like the standard for telephony in Europe switched from RJ11 to RJ45 (not that I have seen a single RJ45 telephone available…) but like any other sane person in 2023 I have dedicated them all to my LAN setup. So, having actual phones is now impossible as I don’t have plugs for them. This would be easily solvable if my ISP, which provides phone over VoIP, would just give me the SIP credentials to my phone line but no, obviously the solution for the phone problem is to have an RJ11 plug on their gateway. Hence, the adventure of converting this “analog” line into VoIP begins!
So without further ado, here’s what you need to accomplish the quite absurd task of turning a POTS line into VoIP:
- Some server running FreePBX (I have it being virtualised on a machine running Ubuntu Server)
- A Grandstream HT813 (or any other ATA device, and if you have another Grandstream with PXO ports it still applies as their 80s UI is the same on every device they make)
- A VoIP telephone (I got a Yealink SIP-T31, should have gotten the PoE version though…)
- A mobile phone to help test the whole thing (who doesn’t have one these days anyway…)
A disclaimer before we start: many of the localisation parts of this tutorial will be applicable to Portugal. I will not cover it for other countries as that would be really hard without having the correct info. If you’re doing this in Portugal, great! Otherwise good luck to you but at least you should have a half running system by the end, which is more than what most tutorials in god knows how many languages provide.
First of all, here are some values that will be used throughout this tutorial. They are just for reference and you should replace them with your own correct values:
| Description | Value |
|---|---|
| Network CIDR | 192.168.1.1/24 |
| FreePBX Server IP | 192.168.1.10 |
| Grandstream IP | 192.168.1.11 |
| POTS Phone Number | 211111111 |
| Trunk Number | 5000 |
| Extension IP Phone | 6001 |
| Extension Grandstream | 6002 |
So let’s jump into the setup of FreePBX. I am assuming you have a clean installation already up and running. If you don’t, it’s easy to find a tutorial online on how to do it (and to be fair it’s mostly just clicking next on the installer and setup wizard).
The first thing we’re going to do is to setup a new trunk. To do so, let’s open the FreePBX GUI and go to Connectivity > Trunks. You should see a similar screen to this, but without the trunk in it:

Let’s add a new trunk. Press Add Trunk and select Add SIP (chan_pjsip) Trunk. You’ll get this screen:

From here, we’re going to setup the Trunk Name and Maximum Channels. You can setup any trunk name you wish but for this tutorial we’re going with Grandstream. The important part is to define the maximum channels as 1. This will prevent FreePBX to attempt to perform a call when the line is being used already (plus, it provides a nice audio message while doing it).
Next, move on to the pjsip Settings tab. Here we’re going to setup the following values:
| Field | Value |
|---|---|
| Username | 5000 |
| Registration | None |
| SIP Server | 192.168.1.10 |
| SIP Server Port | 5062 |
| Context | from-trunk |
By setting the registration to None, we’re preventing some messages from polluting the logs as there won’t be any registration performed between the Grandstream FXO port and FreePBX.
As we want to use the Grandstream as a phone as well, we need to go to the Advanced tab to setup manually the Match (Permit). If you’re using it just as a trunk, skip this step. Setup the field to 192.168.1.10:5062. This ensures that only the FXO port is matched to the trunk.

Finally press Submit. This will not apply the configuration yet, but as we have more configuration to do let’s leave it like this for now.
Now that the trunk is configured, let’s do the extensions next. Go to Applications > Extensions. This is way easier than creating the trunk. By the end of this section, you’ll have something looking like this:
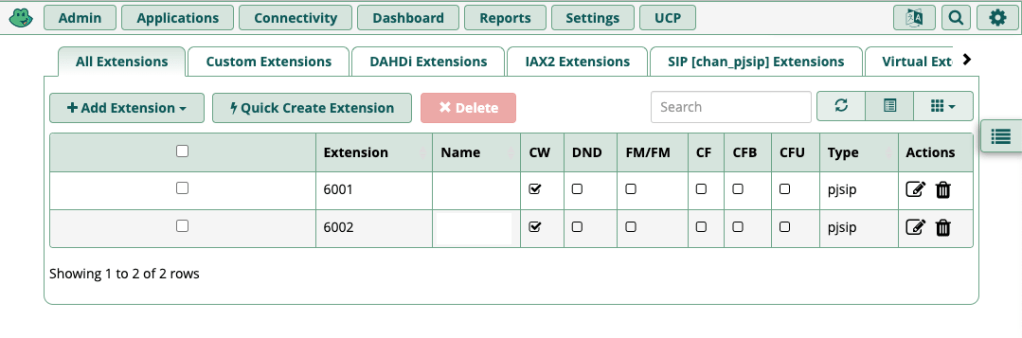
To create an extension, press the Quick Create Extension button. You’ll be presented with a super simple wizard that will create the extension and associated user, together with a voice mail mailbox.

Input the following values in the wizard and repeat it for extension 6002:
| Field | Value |
|---|---|
| Extension Number | 6001 |
| Display Name | John Doe |
| Email Address | john.doe@example.com |
You don’t need to change anything else. When you have finished the wizard, you’ll have the extensions created, linked to a user and the password was sent to the e-mail provided. Super simple, right?
At this point, your PBX is cabable of performing internal calls between the extensions and knows about the outside world, but if you try to make a call to the outside or call your own number you’ll get an error or nothing will happen. We need to setup the inbound and outbound routes. Let’s start with the outbound routes.
Go to Connectivity > Outbound Routes. You should see this screen:
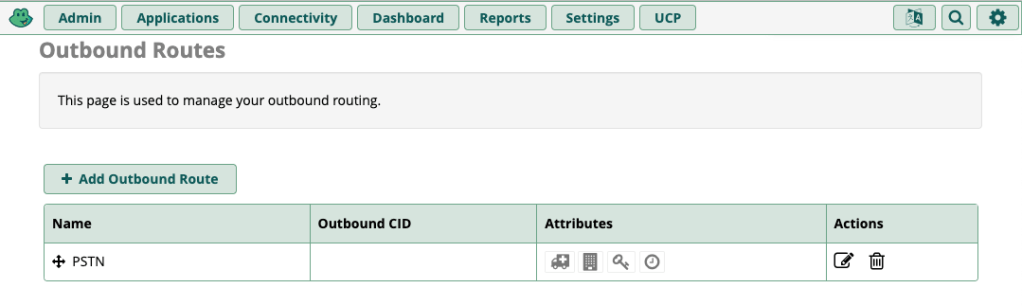
Press the Add Outbound Route button. In here, we’ll need to define the Route Settings and Dial Patterns. The remaining data is not important to us.
| Tab | Field | Value |
|---|---|---|
| Route Settings | Route Name | PSTN |
| Route Settings | Route CID | 211111111 |
| Route Settings | Trunk Sequence for Matched Routes | Grandstream |
| Dial Patterns | match pattern | NXXXXXXXX |
Press Submit. We now have created a route that will match all 9 digit numbers starting in 2-9. This covers the majority of the Portuguese phone numbers. You’ll want to create extra routes for stuff like emergency services, otherwise your IP phones will not be able to call them. You can also use the Dial patterns wizzards, but it’s mostly only useful for the USA.
With this, your PBX is setup to perform calls to the outside world. Now let’s teach it what to do when a call comes in. Go to Connectivity > Inbound Routes.

Creating the inbound route is also very simple. We’ll setup a simple route that will call one of the extensions (you can do more complex setups but I’m not covering them as I wouldn’t even know where to start). Press the Add Inbound Route and on the General tab input the following data:
| Field | Value |
|---|---|
| Description | PSTN |
| DID Number | 5000 |
| Set Destination | Extensions |
| Set Destination | 6001 |
Don’t forget to press the Submit button. And now your PBX also knows how to call the outside world.
And that’s it! FreePBX is now fully configured and ready to be used. But first, you need to press that little red button on the header that says Apply Config. Without this step, the configuration is not applied and nothing will happen!
Now it’s time to go to hell. Hopefully it won’t be too bad for you with the guidance of this post but dealing with the Grandstream HT813 is truly a bad experience. Login with the admin user. If you don’t know the password, it’s admin. Go and change it immediately!
The first place we’re going is to BASIC SETTINGS (yes, this GUI likes to scream at you whenever possible).

There’s not much to do here other than setting up the forward of calls to FreePBX. This is accomplished with the Unconditional Call Forward to VOIP field at the end of the page. Fill in the fields with this data:
| Field | Value |
|---|---|
| User ID | 5000 |
| Sip Server | 168.192.1.10 |
| Sip Destination Port | 5060 |
If you want to setup a static IP address, it’s done here as well. Myself, I prefer to use DHCP and have Unifi (Did you really expect a home user setting up a VoIP PBX to not have a Ubiquiti network?) doing that work for me.
Press Apply at the bottom of the page. If the HT813 asks you to reboot it, ignore it for now, because now we’re going to setup the FXS PORT.

Configuration here is relatively slim, so let’s jump directly to the field values:
| Field | Value |
|---|---|
| Primary SIP Server | 192.168.1.10 |
| SIP User ID | 6002 |
| Authenticate ID | 6002 |
| Authenticate Password | The password you got by e-mail |
| Register Expiration | 5 |
| SIP REGISTER Contact Header Uses | WAN Address |
| Use First Matching Vocoder in 200OK SDP | Yes |
| SLIC Setting | EUROPEAN CTR21 |
| Caller ID Scheme | ETSI-DTMF during ringing |
| Gain RX | 0dB |
This is where localisation settings start to creep in and you may have a different experience with the phone part itself, but the connection to FreePBX should be alright with these settings. Press Apply.
Now let’s go to the fun part. Go to FXO PORT. You should see this:

This is one of the sections where most changes will need to be made, as it is very important to have the HT813 properly detect the end of a call, otherwise FreePBX will freak out and disconnect from it as soon as the first call is over. Here are the fields and their values:
| Field | Value |
|---|---|
| Primary SIP Server | 192.168.1.10 |
| SIP User ID | 5000 |
| Authenticate ID | 5000 |
| SIP Registration | No |
| SIP REGISTER Contact Header Uses | WAN Address |
| Caller ID Scheme | ETSI-DTMF during ringing |
| Gain RX | 0dB |
| Enable Current Disconnect | No |
| Enable PSTN Disconnect Tone Detection | Yes |
| PSTN Disconnect Tone | f1=425@-30,f2=425@-30,c=200/200; |
| Country-based | PORTUGAL |
| Number of Rings | 2 |
| PSTN Ring Thru FXS | No |
And for the final time, press Apply. It is now time to reboot the HT813 to fully apply the configuration. Press the Reboot button.
If everything went fine, you should now be able to plug a phone to the FXS port of the Grandstream and perform your first VoIP call! Just check after rebooting your status page to see if it looks like this:

For the last step, we’re going to setup our IP Phone. Go to the Yealink Web GUI, login with the admin user (same password as the Grandstream and same recommendation, they will even warn you you have the default password. Select the Account tab.

Fill in the following fields in Register:
| Field | Value |
|---|---|
| Line Active | Enabled |
| Label | 6001 |
| Display Name | 6001 |
| Register Name | 6001 |
| Username | 6001 |
| Password | The password you got by e-mail |
| Server Host | 192.168.1.10 |
If you want to set the voice mail address already, go to the Advanced tab and on Voice Mail input *97. Press the Confirm button at the bottom.
The phone will register with FreePBX and after some (small) time, it will be ready to work.
Now that everything is setup, pick up your mobile phone and call your own POTS number. Your IP Phone should be ringing after a bit and telling you the Caller ID of your phone. Now try the other way around and call your phone. It should be ringing! It’s almost as if it’s magic! And now you have the ability to perform all the cool enterprise stuff like calling another internal phone, putting people on hold (with music and everything) and transferring calls.
I hope this post got you to this situation faster than it took me to do it. Let me know if it worked for you by commenting below.
Edits:
- Changed trunk
AORfromGrandstream,6002to empty and addedMatch (Permit)instead as it doesn’t match the FXS port into the trunk. - Updated recommendation to use specific trunk number instead of POTS number + changed Caller ID scheme for Portugal specific value

Thank you!
I`ve been struggling to make it work since last week!!
LikeLiked by 1 person
Thanks! It helps a lot.
But the RJ11 plug connects into the RJ45 outlet… 😉
LikeLike